Wednesday, September 18, 2013

Roasted Vegetables

One of my favorite ways to cook root vegetables is to roast them.  For dinner last night I did just that with carrots, turnips, parsnips and also added in some brussel sprouts, because I love them roasted too.  This is such a simple and delicious way to prepare them.  (Also great with butternut squash!)

What you need:
Vegetables (sturdy ones like those listed above)
Olive Oil
Garlic Salt
Black Pepper
Dried Rosemary

Directions:
1. Preheat oven to 400 degrees.  Cover large baking sheet in foil.
2. Clean and cut veggies into 1/2 inch cubes (trim brussel sprouts and cut in half).


3. Put in a large bowl with a lid or a gallon-sized zipper bag.


4. Add oil and seasonings and shake to coat.  Vegetables should be evenly coated in everything, if not, adjust amounts.  (Sorry, I have never measured here, just added seasonings until it looked even.)
5. Spread vegetables out on baking sheet in a single layer.


6. Roast in oven 30-45 minutes or until tender (I like the outside edges to be blackened), stir every 15 minutes to prevent sticking and to encourage even roasting.


Full Recipe:

What you need:
Vegetables (sturdy ones like those listed above)
Olive Oil
Garlic Salt
Black Pepper
Dried Rosemary

Directions:
1. Preheat oven to 400 degrees.  Cover large baking sheet in foil.
2. Clean and cut veggies into 1/2 inch cubes (trim brussel sprouts and cut in half).
3. Put in a large bowl with a lid or a gallon-sized zipper bag.
4. Add oil and seasonings and shake to coat.  Vegetables should be evenly coated in everything, if not, adjust amounts.  (Sorry, I have never measured here, just added seasonings until it looked even.)
5. Spread vegetables out on baking sheet in a single layer.
6. Roast in oven 30-45 minutes or until tender (I like the outside edges to be blackened), stir every 15 minutes to prevent sticking and to encourage even roasting.


Friday, September 13, 2013

Banana Pudding

One of my husband's favorite summertime desserts is this Banana Pudding recipe.  It was first made for him by my grandmother several years ago and he has been hooked ever since.

What you need:
2 1/2 cups cold milk
1 pkg. (5.1) banana cream flavor instant pudding
1 box vanilla wafer cookies
3 ripe bananas, sliced
8 oz tub of non-dairy whipped topping

Directions:
1. Beat milk and pudding with a wire whisk (I like my electric mixer) for 2 minutes.  Let stand 5 minutes.
2. Arrange cookies in bottom and up the sides of a 2.5 quart bowl.


3. Top cookies with a layer of bananas (use 1 1/2 bananas).


4. Pour half of the pudding mixture over cookies and bananas.


 5. Spoon half of the whipped topping over pudding.


 6. Arrange a second layer of cookies and the remaining bananas.


 7. Add the remainder of the pudding and the remainder of the whipped topping.


8. Refrigerate overnight.
9. Add fresh cookies and more bananas, if desired before serving.  (Sorry, I didn't manage to get a photo of this before my husband dug into it.)


Full Recipe

What you need:
2 1/2 cups cold milk
1 pkg. (5.1) banana cream flavor instant pudding
1 box vanilla wafer cookies
3 ripe bananas, sliced
8 oz tub of non-dairy whipped topping

Directions:
1. Beat milk and pudding with a wire whisk (I like my electric mixer) for 2 minutes.  Let stand 5 minutes.
2. Arrange cookies in bottom and up the sides of a 2.5 quart bowl.
3. Top cookies with a layer of bananas (use 1 1/2 bananas).
4. Pour half of the pudding mixture over cookies and bananas.
5. Spoon half of the whipped topping over pudding.
6. Arrange a second layer of cookies and the remaining bananas.
7. Add the remainder of the pudding and the remainder of the whipped topping.
8. Refrigerate overnight.
9. Add fresh cookies and more bananas, if desired before serving.


Prep Time: 15 minutes
Refrigeration: 8 hours to overnight
Total Time: 8 hours 15 minute to 24 hours
Yield: About 14 - 1/2 cup servings

Pumpkin Cake Doughnuts

I LOVE just about anything pumpkin flavored.  So, when I saw this recipe I had to try it.


Here is the recipe:

Doughnuts
1/2 cup vegetable oil
3 eggs
1 1/2 cups sugar
1 1/2 cups canned pumpkin
3/4 tsp ground cinnamon
1/4 tsp ground nutmeg
1/4 tsp ground ginger
1 1/2 tsp salt
1 1/2 tsp baking powder
1 3/4 cups + 2 tbsp all-purpose flour

Coating
cinnamon-sugar

Directions
1. Preheat oven to 350 degrees.  Lightly grease two standard doughnut pans.
2. Beat together the oil, eggs, sugar, pumpkin, spices, salt, and baking powder until smooth.
3. Gradually add the flour, stirring just until smooth.
4. Using a 1/4 cup measuring cup, fill the wells of the doughnut pan (about 3/4 full).
5. Bake the donuts for 15 minutes, or until a toothpick inserted in the doughnuts comes out clean.
6. Let doughnuts cool in pan for about 5 minutes before transferring them to a wire rack to cool.
7. After cooled, gently shake the doughnuts in a bag with the cinnamon-sugar to coat.

Prep time: 15 minutes
Bake time: 15 minutes
Cooling time: 10 minutes
Total time: 40 minutes
Yield: 12 baked doughnuts*

I thought they were very good--next time, I may add chocolate chips though...

*I somehow managed to get 19 doughnuts from this batter.

Wednesday, September 11, 2013

No More Pinched Fingers!

We have very large, very heavy wooden doors in our home.  It has always been a fear of mine and my husband's that one day one of our children would end up losing a finger when his/her sibling slammed the door.  So, to keep this from happening, and to keep our little one from closing herself in her room, we cut up one of those Styrofoam pool noodles from the dollar store and put it on the side of the kids' bedroom doors.  We put them up in the morning and take them down at bedtime; very simple.

We cut the noodle into one foot long pieces and then cut a slit down the side.  Over time the slit has widened to the shape of the door.
It slides right onto the edge of the door.

With it on, the door can close but will leave a one inch (or so) gap so that fingers don't get pinched and the door doesn't latch.

Monday, September 9, 2013

Essentials Jar for Guests

I filled a large cookie/candy jar (not sure what you call this thing, but it was $10 at Walmart) with all the little toiletries that we got in hotels, the free toothbrushes, toothpastes, and floss that the dentist gives us, and added in some other essentials like razors and shave cream.  I put it in our downstairs "guest" bathroom so that if anyone forgets to pack something, it will most likely be in here.


Friday, September 6, 2013

Boy's Room

My son also received new bedding when his sister did.  We had to come to compromise on not making the entire thing Ninja Turtles and I think it turned out nice.


Girl's Room

We finally sold our crib and converted the nursery into a "big girl's room."  It is still a work in progress, but here is my daughter's room so far.


Have Box, Will Color

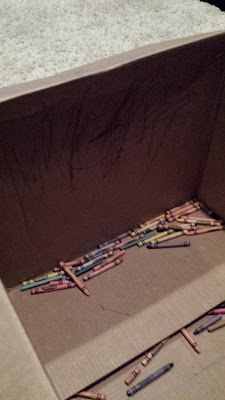
I received a delivery from Amazon of diapers and baby wipes in one great big box the other day.  Instead of breaking it down and taking it straight to the trash can, like I usually do, I decided to throw both of my children and a bag of crayons into it to see what happens.  Here are the results:


Thursday, September 5, 2013

Catching Up: Orange, Pink, Silver Baby Shower

I threw an orange, pink, and silver baby shower for a friend last year and here are the pictures from that.


The balloons were inflated with just plain air and then hung from the ceiling with tape (not enough, though, because every time the front door opened the breeze knocked one down).


I served spinach pinwheels and caprese skewers (so yummy!) along side fresh fruit and cupcakes.


The punch is my grandmother's recipe for jello punch and the candies are orange gumballs, orange sixlets, and sour grapefruit gummies.


Chocolate cupcakes with orange and pink frosting and silver sprinkles were a perfect dessert.


Tuesday, September 3, 2013

Catching Up: Bandanna Quilt

For my birthday this year I received my first sewing machine.  And, as a project to help me familiarize myself with the machine I made a bandanna quilt.


It is exactly what it sounds like: 12 bandanna squares, fabric for the back (the grey that you see is the back), and batting.  I started out thinking "pre-cut squares and a back, what could be easier?"  Well, almost.  For starters, not all bandannas are created equal.  Each square was a different size (and shape) from the others.  And, since I did not want to cut the bandannas in anyway because I did not want to lose the look of them, I just had to deal with it.  So, lines are not straight and the quilt is not exactly rectangular.  The other problem with it is purely my fault--a hasty cut on my part caused for some real headaches.  But, I figured it out and, while it may not be pretty it is soft and warm.

Catching Up: Wipes Box

This was a very simple means of entertainment for my toddler (and, let's face it, my preschooler as well).  I took a clean baby wipes box and filled it with some quilting scraps that Grandma had saved.  Free (since most boxes of baby wipe refills come with a free plastic box) and fun!


Catching Up: Ninja Turtle Birthday Party!

My 4-year-old is absolutely obsessed with TMNT.  So, for his fourth birthday party, I made him this Raphael cake.


It is a very simple round layer cake (Funfetti, of course) with green-tinted vanilla frosting.  I used red decorator frosting for the eye mask and mini chocolate chips for the eyes and mouth.

I also made these balloons to go along with the theme.


These were simple: green balloons, crepe paper in blue, red, purple, and orange.  White paper for eyes (wish I had cut them larger) and black permanent marker.

Wednesday, August 28, 2013

Catching Up: Window Coverings

I, like many mothers, have a very serious love-hate relationship with summer and how late the sun stays up during those months.  My daughter's bedroom has three wonderful 21x21 inch windows that I loved all through the winter months.  But, when daylight savings time went into effect, it was still too bright to expect my little girl to fall asleep before 10 pm in her west-facing room.  So, to combat daylight savings time, I created these.


They are canvases from the craft store that I painted with acrylic paints with the assistance of blue painter's tape and a pretty bird stencil.  I had never done chevrons before, as you can probably tell, and, for the most part, winged it.  They are a bit crooked and will probably be replaced before too long, but I absolutely love how the other two turned out!

Now I just have to figure out where to put them when we enter the fall and winter months and I want those windows uncovered again...

Catching Up: Ladybug Cupcakes

My daughter's first birthday was all about ladybugs.  One of her first words was "bug" and they are still some of her favorite things.


I used vanilla frosting tinted purple (it had to be purple, my mother was coming all the way from Michigan for this party and purple is her FAVORITE color; also, when the baby dives face-first into her first cake, don't we want the frosting all over her face to be dark enough to look great in pictures?), black decorator frosting for the spots, peppermint patties for the head, and colorful M&Ms for the eyes.  They were a hit!

Catching Up: Avengers Cupcakes

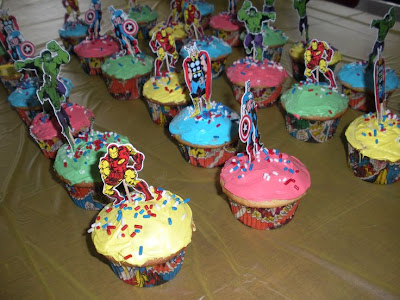
For my son's third birthday party everything was Superheroes with a very strong emphasis on The Avengers!  I found these cupcake liners and toothpicks from Williams-Sonoma and the rest was done with colorful frosting and sprinkles.


Catching Up: Mickey Mouse Cupcakes

For my son's second birthday party the theme was Mickey Mouse.  I had a very intricate design planned for his cupcakes, but, as commonly happens when you have children, the day of the party fell apart and things fell behind.  So, I improvised and made very simple, but still-adored-by-my-2-year-old, chocolate and vanilla cupcakes in the shape of Mickey's head.


I baked the cupcakes as directed and then dipped them in melted icing to get the smooth, shiny look.

Catching Up: Caterpillar Cupcakes

For my son's first birthday I made these caterpillar cupcakes.  They were so easy and turned out very cute.


It was my first child's first birthday, so these were my first try at decorating cakes and I like how they turned out.  I would probably do some things differently if I were to do them again, but they were great for my lack of experience.

I baked the cupcakes as I normally would.  I then melted and tinted my frosting.  The pink cupcakes were supposed to be red (trying to use primary colors) but pink was as good as it got.  I then dipped the cupcakes into the frosting because I wanted a smooth surface.  I then piped (and this is where lack of experience really shows) the polka dots onto each cupcake.  The antennae are made of toothpicks and colorful mini marshmallows.  I also used toothpicks and black jelly beans to make feet.


Let's Catch Up!

I have a few creations that are old, but still great.  I am going to post what pictures I have of them in the next couple of posts. I apologize for the lack of visual aids--I am going to do my best to describe how everything was done; however.  Please let me know if you have any questions on anything.

Monday, August 26, 2013

Making the Pocoyo Cake!

I made this cake for my daughter's second birthday party.


Here's how:

The first thing I did was find a coloring page of Pocoyo (I did just him because I wanted something very simple).  I pulled an 11x14 piece of glass out of a frame that I was not using, cleaned it up, and taped my coloring page underneath the glass, picture side up.


I then taped a piece of parchment paper to the top of the glass.


Using black decorator icing, I traced the outlines of the picture.


And then filled it in with my colored frosting.


I put it in the fridge overnight so that the frosting could harden.  It probably wouldn't require that much time in the fridge, but I had it.  I suppose you could also put it in the freezer if you are in a crunch, but I would worry about it cracking when applied to the cake (even refrigerated I had a little of that).

Also, be sure to save all of your frosting for touch-ups!

The next day I made my cake and added a thin layer of white frosting to the top of it.  I was not as thorough with the white frosting as I should have been.  I should have covered the entire top of the cake with the white because the balloon was not fully on icing and did not lay flat and pulled cake up as I peeled the paper off.

Anyways, after the top had frosting on it, I held my breath, removed the tape from the parchment paper, and flipped little Pocoyo onto the cake.


I had managed to get it centered on my first try, which was awesome since moving it would have sucked.  I pressed the little guy lightly into the white frosting and then proceeded to pull the paper off of him.  When you do this, go slowly enough so as not to rip him, but quickly enough that your icing does not melt while you are doing it.  I should have done this in two parts and left the balloon in the fridge while I put Pocoyo on because, by the time I got to the balloon, the frosting was already soft and did not want to come off the paper.  With a knife and a lot of patience I managed to get the balloon onto the cake, where it belonged.


And, after a little touching up (remember that saved frosting), he looked great.  I did miss a part of his sleeve, but not bad.